HDR is the way to go when it comes to urbex photography but there is a lot more to gain by just knowing how this technique works. In this tutorial I am going to explain to you how I craft my HDR images.
Believe it or not, a good HDR starts with a good set of pictures. I say set on purpose because that’s what you as a photographer should do. Many people — more than I’d like — love to think that HDR is somehow synonymous to this ugly-overkill-look like some of the HDR pictures you see on the internets have, but that is not what HDR is. A HDR picture does not have to make your eyes bleed at all if done correctly. These pictures that you see might not even be HDR, just toned with a HDR colorscheme. Confused? Well, it will get to you after reading the entire article. Promised.
Anyways, your camera should have a bracketing mode. This mode will tell the camera to make a couple of pictures with different exposures and the way your camera will go about this is by adjusting the shutterspeed for each shot. This means that you will have a set of 5 pictures (one darkest, one dark, one middle, one light, one lightest) if you shoot with a bracket of 5 pictures — this is up to you but I would recommend to shoot 5 exposures. The problem with single exposed shots — per example on an urbex location — is that the inside of the building is extremely dark and the outside is not. This means that if you expose for the windows that you won’t see a whole lot of the room because the room will be underexposed. If you expose for the room instead the windows will be blown out and unrecoverable. This is why you shoot a bracket because the contrast is way too big for any camera to handle.
After a day of shooting brackets, eventually I will make the HDR in Photoshop. Just click file, automate, merge to HDR pro and get going. You will get a window now where you can select the pictures to merge. Just pick the pictures you shot in a bracket that you want to convert to one HDR image and click Okay. In the top right make sure you merge in 32 bit mode because 16 bit is not sufficient for highlights/shadows. Click tone in ACR on the bottom right to start merging. Your bracketed images are now merged into a single HDR image and you can edit this like you normally would in CameraRAW. For those who used lightroom before, CameraRAW should not cause any issues as the interface is pretty much the same as Lightroom. It literally does the same too. After editing the picture click okay and the latest version of Photoshop should make a 16 bit image out of the final result. If you are on an older version of Photoshop you have to copy the layer and click on image > mode> 16 bits. Click on ‘don’t merge’ at the popup. Regardless of what version you are using, now you can do lenscorrections as well or use any other filters or adjustments if you ever need to do so. That’s all there is to it!
So in short:
- A single image is NOT an HDR image regardless of your edit
- Try to aim for a bracket of 5 exposures but no less than 3
- Merge your bracket in Photoshop into a single HDR image. You can also use Lightroom or dedicated programs such as Photomatix
- A good HDR will not make anyones eyes bleed
Here are some pictures for visual aid:
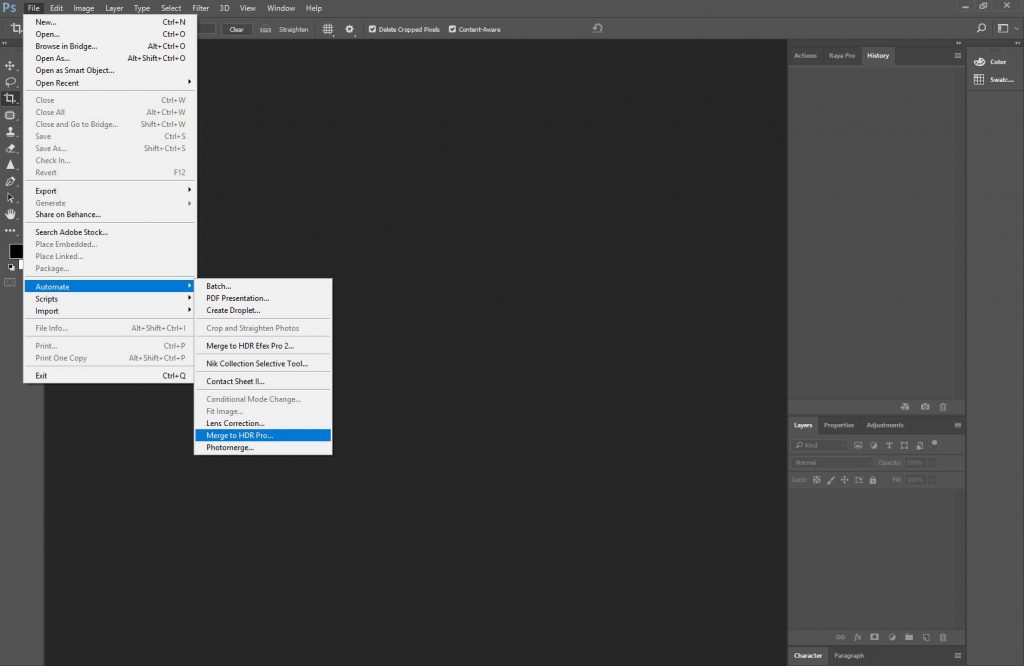
Just click file > automate > merge to HDR pro to get started
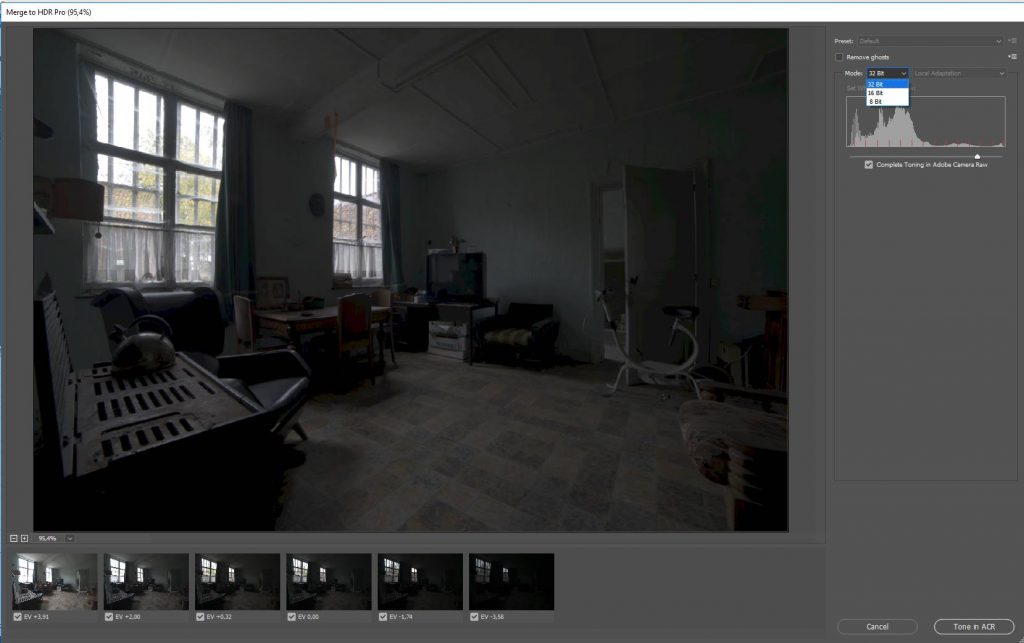
After selecting your bracketed shots, make sure to select 32 bits on the top right, then click Tone in ACR on the bottomright